Knowledge Base » Documentation MailCleaner »
MailCleaner on Amazon Web Services (AWS)
MailCleaner Support
Added almost 8 years ago
!!!!!! Actually MailCleaner is NOT available anymore on AWS ( 2023/06/15 )
French version below / version française ci dessous: https://support.mailcleaner.net/boards/3/topics/41-mailcleaner-on-aws-french-version
ENGLISH VERSION
Welcome to this knowledge base which describes how to configure your MailCleaner server(s) on AWS. Please note this is a enterprise version and you require to first ask for a trial version at sales@mailcleaner.net.
Here are the AMIs IDs by region:
| Region | AMI ID |
|---|---|
us-west-1 |
ami-0931a1be57c490a53 |
us-west-2 |
ami-00c3011651620741c |
us-east-1 |
ami-077e7fc7cc99d6ad0 |
us-east-2 |
ami-0d8aaa170487aab8d |
eu-west-1 |
ami-08f5d4fca3fd59aaf |
eu-west-2 |
ami-00bb1be62ecd6ff48 |
eu-west-3 |
ami-0bd9a47e477b0c097 |
eu-central-1 |
ami-068f65f97e138b094 |
ca-central-1 |
ami-079f6ada6a22bb786 |
ap-southeast-2 |
ami-000d679a58151f945 |
Please let us know if your region is not available, and we will add it.
The first thing to do is to create a MailCleaner instance from our Community AMI. Here are the steps to follow :
BE CAREFUL to use a FIXED PUBLIC IP: https://pragmaticintegrator.wordpress.com/2012/12/13/assign-a-fixed-ip-to-aws-ec2-instance/
- Choose AMI : From your EC2 interface, create a new instance and search for"MailCleaner" in "Community AMIs" (see screenshot : step1.png). AMI-id has to be ami-51ad7d31
- Choose Instance Type: Make sure that your instance type meets the minimum requirements (2 CPU, 4 GB RAM, 60 GB SATA III - 7200 rpm hard drive, 100 Mbps network, 2 Mbps network connectivity) by example m3.medium
- Configure Instance Details: if you are building a cluster, you can set the Number of instances to your number of hosts including the master.
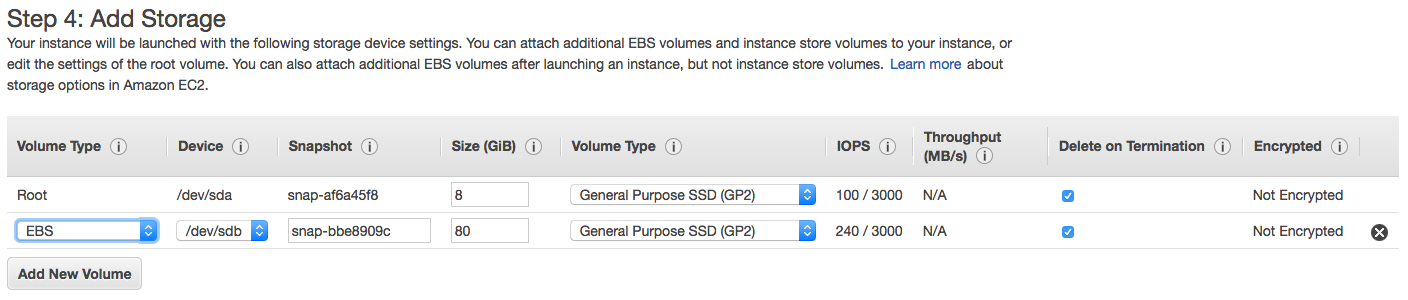
- Add Storage: Make sure to respect the minimum requirements. Choose an EBS volume type with 80 GB (see screenshot : step4.png)
- Tag Instance: this is all up to you
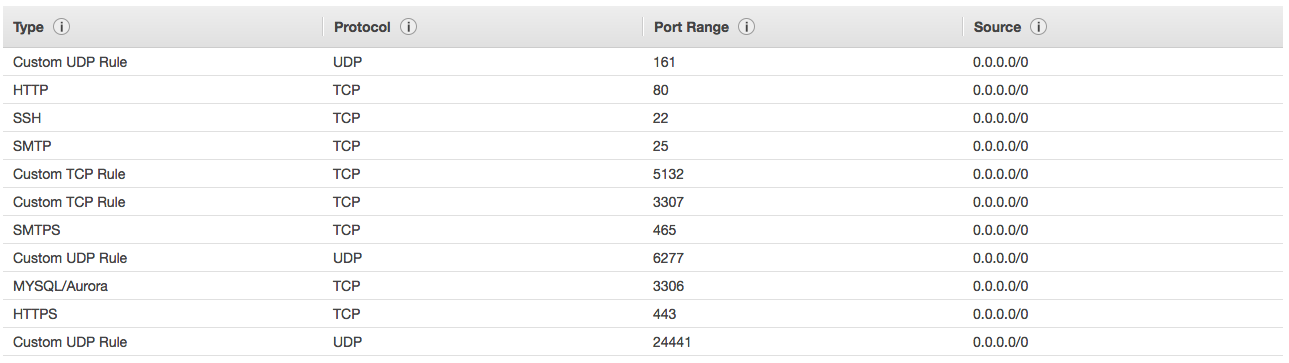
- Configure Security Group: be sure to create all firewall rules you require (see screnshots : step6-inbound and step6-outbound)
- Review: You can Launch your instance(s)
Once this is done, connect (with https) to only one of your MailCleaner's instances with those credentials :
- https://aws_public_ip/admin/
- User:
admin - Password:
MCPassw0rd
WARNING If you are redirected to https://mailcleaner/admin/, re-enter https://aws_public_ip/admin/ and go to Configuration > Services > Web interfaces > and change the Base URL with your public AWS Ip.
Go to Configuration > Base system > Registration menu then enter your license (that you should have get from our sales department).
Cluster configuration :
For connecting to your MailCleaner through SSH, the best is to use the SSH key provided when creating the instance.
You can also use, for now, the username root and password MCPassw0rd.
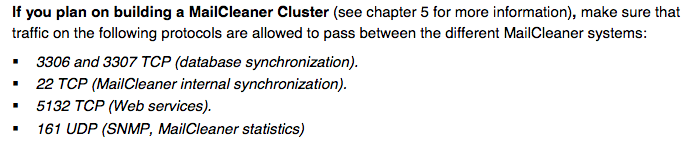
Create a security group for connections between the MailClelaner nodes. You have to create a security group and attach it to each MailCleaner instances of your cluster (see the attachment: firewall rules for cluster.png)
All your servers must have a different HOSTID. By default HOSTID is set to 1. So you can let one server with this ID. Let s say this will be your master node.
Connect to all other servers with SSH to give to each of those a different HOSTID
- Launch ifconfig and note the private IP.
- Launch cat /etc/mailcleaner.conf and save the result to a text file.
- Launch /usr/mailcleaner/scripts/configuration/slaves.pl and then choose 1) change host settings (required!) then insert the private IP
- You then come back to the script menu. Choose 3) delete slave then insert 1 as slave id and hit enter.
- You then come back to the script menu. Choose 4) add slave then insert the Slave Id of the current server. Insert hostname, private IP and the password corresponding to the field MYMAILCLEANERPWD from the second step.
- Exit the script by pressing q and wait.
- Then, edit the file /etc/mailcleaner.conf to modify the "HOSTID =" line with the HOSTID given to the current server. Also change the line "ISMASTER =" to "ISMASTER = N"
Once this is done for each slave servers, you ll need to register all of your servers. Connect to https://aws_public_ip/admin/ go to Configuration > Base system > Registration. All your different instances will use the same licence but will upgrade to the latest MailCleaner version only if they all have a different HOSTID
Once all instances are up to date, you can go on with the classical HOWTO to configure a cluster at chapter 5 Cluster configuration: http://www.mailcleaner.net/downloads/MailCleaner-installation.pdf
Once the cluster is correctly set up, change Configuration > Base system > DNS settings > Force HELO / EHLO identity with to your own domain name.
step1.png - step1 - MailCleaner Anti Spam AMIs (44.5 KB)
step4.png - step4 - EBS volume (90.7 KB)
step6-outbound.png - step6 - Firewall rules inbound (14.6 KB)
step6-inbound.png - step7 - Firewall rules outbound (62.7 KB)
firewall rules for cluster.png (40.9 KB)